Method 1: Simplified Startup
- Open the System Configuration panel. If a certain app that launches automatically is causing your system to freeze, you can disable it in your startup options. But first, try running Windows with a Selective Startup so you can see if your PC continues to freeze without your startup items. To open System Configuration:
- Press Windows key + S.
- Type msconfig and press Enter.
-

-
Click the General tab. This displays three options for starting your PC.
-

-
Select Selective startup. It’s the third option.
-

-
Remove the checkmark from “Load startup items.” Leave the other items checked.
-

-
Click OK and restart your PC. When your PC reboots, see if you can recreate the problem that cause Windows to hang or freeze. If Windows no longer freezes, the issue is likely being caused by one of the apps set to launch automatically.
-
-
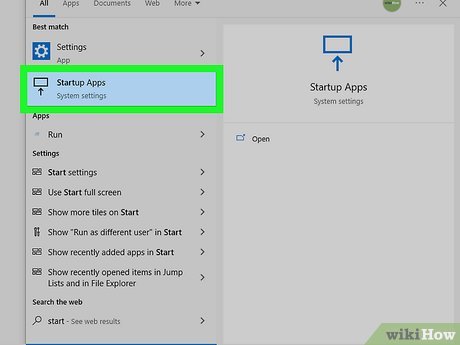
Open your Startup Apps. Now you can choose which apps will start automatically and which you’ll have to start manually.


- Press Windows key + S and type startup apps.
- Click Startup Apps in the search results.[10]
-

-
Toggle off any apps that you don’t need to launch automatically. Not only can a rogue startup app cause your PC to freeze, it can also make Windows run more slowly. Toggle off any apps you don’t want to launch automatically each time you boot up your PC.[11]

- You can always launch these apps from the Start menu as needed even if they don’t start automatically.
-

-
Re-open System Configuration. This is the tool you used before. Just press Windows key + S, type msconfig, then press Enter.
-

-
Check the box next to “Load startup items.” You’ll want to leave “Selective startup” checked as well.
-
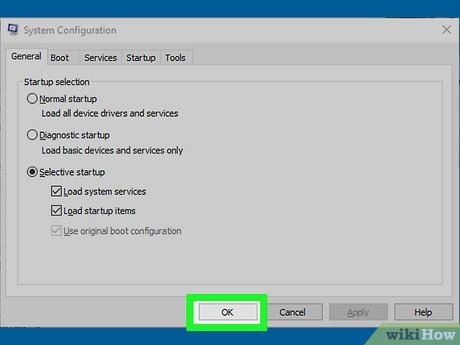


10 Click OK to save your changes. Now when you reboot your PC, Windows will start with only the applications you allowed to launch automatically.
Method 2: Scan the File System
Press Control + X on the keyboard. This opens the Power User menu, where you’ll find a quick link to run the command prompt or Windows PowerShell as an administrator. You can use this tool to scan for and repair correct Windows system files, which can help fix issues with freezing and hanging.
2. 
2
Click Command Prompt (Admin) or Windows PowerShell (Admin). You can run the system file checker from either of these locations.[12]
- If you’re using Windows 11, you may see Windows Terminal (Admin). This will work, too.
-

3
Type DISM.exe /Online /Cleanup-image /Restorehealth and press Enter. If you’re using Windows 8.1, Windows 10, or Windows 11, run this command before scanning the file system.[13] If you’re using Windows 7, skip this step.
- This command connects to Windows Update to get the necessary files required to fix corruption. It can take up to 30 minutes to complete, but typically won’t take that long.
- After a few moments, you’ll see “The operation completed successfully.” At that point, you can continue to the next step.
-

4
Type SFC /scannow and press Enter. This checks your system files, which may take several minutes. Make sure you don’t close the window while the scan is in progress.[14]
- If corrupted files are detected, they’ll be replaced with repaired versions.
- If the scan does not find corruption, you’ll see the message “Windows Resource Protection did not find any integrity violations.”
- If you see a message that says, “Windows Resource Protection could not perform the requested operation,” try running the scan again in Safe Mode.


Method 3: Check The Hard Drive
Open the Windows File Explorer. You can do this by right-clicking the Start menu and selecting File Explorer or by clicking the folder icon on your taskbar. If your hard drive is not performing properly, it could cause your PC to freeze. Fortunately, you can easily check your hard drive from File Explorer.
- If you have multiple hard drives, remember to check them all.
-

2
Click This PC. You’ll see this in the left panel. A list of all connected drives will appear in the right panel.
-

3
Right-click your hard drive and select Properties. A dialog window with several tabs will appear.
-

4
Click the Tools tab. This displays options for error checking and optimization.
-

5
Click Check. You’ll be prompted to scan your hard drive.
-

6
Click Scan drive. Windows will now scan the selected hard drive for errors.[15] If any errors are detected, Windows will attempt to repair them.
- Repeat for all drives connected to your PC.


Method 4: Run a RAM Test
Open the Windows Memory Diagnostic tool. If your RAM is bad, your PC will seemingly freeze at random, often leaving you no other option than to do a hard reboot.[16] Fortunately, Windows comes with a free RAM checking tool. To open it:
- First, save any work you have open, as your PC will reboot to use the tool.
- Press Windows key + S.
- Type mdsched.exe and press Enter.
-

2
Click Restart now and check for problems (recommended). This option will instantly reboot your PC and run a memory scan outside of Windows.
- The scan may take a while, so feel free to get up and come back later.
- Because this tool won’t always show the test results, we’ll show you how to find them once Windows boots back up.
-

3
When the scan is finished, right-click the Start menu and select Event Viewer. When the scan is complete, your PC will boot back into Windows. To see the results, you’ll need to check the Event Viewer.[17]
-

4
Click Windows Logs in the left panel. Several logs will appear below.[18]
-

5
Right-click the “System” log and select Find… The “Find” window will expand.
-

6
Type MemoryDiagnostics and click Find Next. This searches the system log for all entries created by the Windows Memory Diagnostic Tool.[19]
- If no errors are found, the issue is not likely related to RAM.


Method 5: Disable Link State Power Management
Press the Windows key + S and type power. If your PC freezes while your PC is idle, goes to sleep, or wakes from sleep mode, you may be able to fix the freezing issue in your power settings. When you type power, several search results will appear.
2. 
2
Click Edit power plan. This displays information about your current power plan.
3. 
3
Click Change advanced power settings. This appears below the general settings for the plan.
4. 
4
Double-click PCI Express. Another option will expand.
5. 
5
Double-click Link State Power Management. Now you’ll see options for configuring your power settings for this item.[20]
6. 
6
Select Off from the menu(s). If you’re using a laptop, you’ll want to choose Off from both menus.
7. 
7
Click OK. Disabling this feature often resolves issues of freezing caused by power and sleep settings. If this doesn’t resolve your issue, you can return to your power options to reenable Link State Power Management.[21]
Method 6: Clear Cached and Unneeded Files
Open the Disk Cleanup tool. If your Windows cache contains any corrupt files or your hard drive is getting full, you might experience system crashes and freezes. You can easily get rid of all unnecessary files, including temporary Windows files, in Disk Cleanup. To open the tool:
- Press Windows key + S.
- Type disk cleanup.
- Click Disk Cleanup.[22]
-

2
Click Clean up system files. You’ll see this at the bottom-left corner of the window.
-

3
Select which files to delete. If you just want to delete temporary files created by Windows, check the boxes next to “Temporary files” and “Temporary Windows installation files.” You can also select other options, such as “Recycle Bin,” if you want to free up some space in general.
-

4
Click OK. A confirmation message will appear.
-

5
Click Delete Files to confirm. Once the files are deleted, the tool will close.
- If you’re still low on hard drive space, your PC may continue to freeze and crash. Check out these tricks for freeing up hard drive space.


Method 7: Roll Back the Latest Update
Click the Start menu and select Settings. If your PC started freezing after a Windows Update, you can try rolling back the update to see if that resolves the problem.[23]
- If you’re unable to use Windows at all because it keeps freezing, try booting into Safe Mode before you perform these steps.
-

2
Click Update & Security (Windows 10). If you’re using Windows 11, you can skip this step.[24]
-

3
Click Windows Update. This opens the Windows Update panel.[25]
-

4
Click View Update History or Update history. You’ll see one of these two options depending on your operating system.[26]
-

5
Click Uninstall updates. It’s at the bottom of the right panel on Windows 11, and at the top of Windows 10.[27]
-

6
Select the most recent update. You’ll see a list of all recent Windows Updates here, as well as some other apps that have update features built in. Click the most recent update that occurred around the time your PC started freezing or hanging.
-

7
Click Uninstall. You’ll see this at the top of the list. This removes the selected update from your PC.
- Most updates will attempt to reinstall automatically, so you might want to pause updates to see if uninstalling this latest update fixes your problem. To pause updates, return to Windows Updates and select a time period on “Pause Updates.”


Method 8: Run a System Restore
Open the Windows Control Panel. If you think you know when your PC started freezing, you can try restoring your system to a point in time before the freezing began. To open Control Panel, press Windows key + S, type control panel, then click Control Panel.
2. 
2
Type recovery into the search bar. You’ll see this search bar at the top-right corner of Control Panel.[28]
3. 
3
Click Recovery in the search results. This displays your advanced recovery options.
4. 
4
Click Open System Restore. If System Restore is enabled, you’ll see the most recent recommended restore point, as well as the option to choose an alternative.
- If you don’t have any restore points, you’ll need to try another method.
-

5
Select a restore point. If the recommended restore point is too recent, click Choose a different restore point and select Next to find an earlier one.
-

6
Click Scan for affected programs. This option tells you which software will be removed and which updates will be rolled back if you were to continue with the system restore. When you’re finished, click Close.
- System Restore will not affect your personal files.
-

7
Click Finish to restore your PC. This restores your PC to the selected time and date.


